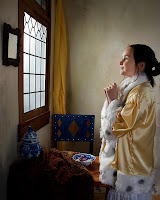
I am unapologetic about the use of any tool I find worthy to help produce my work, including Photoshop, Lightrook, Nik Software (recently acquired by Google) etc. Let’s be clear, artists produce fiction, NOT reality. Painters produce visual fictions, just like poets and writers create fictional stories. Movies are also fictional even when portraying real stories. Now that the premise has been established, I will dive into the Post-processing of some of my work, specifically the Vermeer series.
RAW
I shoot ONLY RAW as they have a higher dynamic range than JPGs. RAW images present colors quite muted which normally do not reflect what you saw in reality. In short, if you shoot RAW you MUST process them, which I normally do in Adobe Lightroom.The Problems
First, I look for what has to be corrected, that is:- Geometric Lens distortions caused by the lens, vertical or, horizontal position of the camera
- Color problems, e.g. chromatic aberration, noise, etc. RAW processing always means a vibrance and saturation boost.
- Exposure (if applicable)
- Cropping and Alignment: I sometimes use the Golden ratio, Rule of thirds or triangle depending on the image. When possible, aligning the image and its cropping with one of these, normally produces a more pleasant composition.
 Enhancements
 Once I have corrected what I feel is technically wrong, I concentrate on enhancements. If we use the “Girl with a Pearl Necklace” (see finished photo painting at left) as an example, I felt that to get closer to the painting-look that I wanted; I needed to darken the shadows a bit to create more contrast. I also normally boost “clarity” a bit. Lightroom has a “Tone Curve” adjustment widget that allows very good control of the tonalities based on values captured on the actual photo. You can see the histogram in the background.
Using this tool you can click on the rim of her face and boost the highlights. Using the same tool you can also darken shadows in the back wall to create a more effective painting look. At the end, it is all about creating that vision you have in your mind of what the final image should look like.
 Another enhancement I find useful, is to warm the temperature a bit. I find that most paintings of the period had a warm tone.
 Additions
At this point I had to leave Lightroom and launch Photoshop carrying Lightroom edits. This was necessary because I needed to clone out a piece of brick wall that appears at the lower left. The fabric that I use for the curtain was also split and needed to cloned in. You can see what I mean in the picture at right.Another reason for going to Photoshop, I want to have any enhancement applied as a layer in the PSD, so that I can come back at anytime and work on it, turn it on or off. This is not currently possible in Lightroom which does not support layers, masks. It is just a RAW processing environment.
Photoshop also allows blending textures which I have done for some of my still life photographic paintings. That’s how I include the cracks or sometimes the grungy vignetting. Over the years, I have accumulated a wide variety of textures by photographing walls from Cordoba, Spain, cracks in the walls of Van Horne’s house in Saint Andrews, bark from Sequoias in Mariposa Grove, tin walls from Bodie, skies from Calgary, Toronto, Madrid, etc. You can see what I mean in the capture below, which is just few of them. I am always looking for these whenever I go. As per today I have 187 of them.
 Textures produce interesting effects in the photos depending on the blending mode used. I have used textures in just a couple of the Vermeer series, specifically “A Vanitas for the Stadhouder”, but not in “Girl with a Pearl Necklace”.
 Lastly, I convert the colors from Adobe RGB 1998 to sRGB for publication on the web. I keep the “original” PSD in Adobe RGB 1998 which is a wider colors map.
Feel free to connect with me in Facebook or Twitter
No comments:
Post a Comment