 I know that readers will think that I am a bit crazy, but yes! I built a set in my studio that looks like the typical “Vermeer” corner you see in most of his paintings (example at right my own exploration of “The Letter Reader” a.k.a. “Girl reading a letter at an open window” c.1657 oil on canvas (84 x 65.5 cm) Staaliche Kunstammlungen, Dresden).
Recently a group of enthusiastic photographers under the 365project have challenged themselves to use my Dutch Golden Age photographic paintings as the basis for their exercise. You can see below what they want to accomplish.

They contacted me and asked me how I lit my “Girl with a Pearl Necklace”. They also wanted to know what kind of post-processing I used.
This is something I was planning to write about at certain point. When I exhibit my work I get to talk to many people and; more often than I could expect, they tend to think that everything was done using software like Photoshop. So, revealing “my secret” is something that I felt should be done, so that people realize how much work goes into these works.
I would say that, a successful re-creation or a work inspired by of a Dutch Golden Age masterpiece must have recognizable features from paintings of the period. In a nutshell you will need a set, the lighting, props and a costume.
The Set
I could not see any other way of making these photographic paintings; it will give me total control over two very important aspects the lighting and the window.
The light will always come through the window as in Vermeer works and the actual window, which I had to make sure I could open or close as needed.

I started by building a window that look like the one in the painting above. This particular design appears in several Vermeer works, it is a very recognizable feature, almost like a stamp. The window also serves as a diffuser of the incoming light, and, its reflection on glass would work for my other Dutch Still Life works; Ointbijtjes, Pronks and Vanitas.

Arm yourself with patience for this one as you would need to design and transfer the shapes for the glass. I used CorelDraw to trace the window from Vermeer’s own “The Letter Reader” where you can clearly see the window. Then “transformed” it to a flat shape, printed it with the measurements corresponding to my window and transferred the design to an acrylic sheet. Once marked, I used wood trims which I painted with wrought iron paint. You can see it in the photo at right.
 Then, I built the walls with some light material that comes in 8x4’. You can get those at any building supplies store. I built a frame behind for stability and then plastered the wall, smoother it with sand paper and painted it using watercolors to get that old look. See at right.
I also made the “Delft” tiles with XVII century motives that can be seen in Vermeer, Peter De Hooch and many other Dutch masters' works of the period. One of those tiles became the logo for my site and blog. See detail at right from my "The Milkmaid has Left".
Same for the typical white and black marble floors, for this I "hired" my daughter who is also my model, to make a Vermeer-like tiled floor with white paper.
Lighting
 Dutch and Flemish paintings of the period had very recognizable lighting, some of them emulating Caravaggio, who had a formidable following amongst Dutch painters. Most Dutch painters set up studios with windows facing the north to maximize the light hours of the day. I emulated that by using Strobes in my studio, where I have 100% control of the light source, intensity, direction, softness or hardness.
The lighting for the “Girl with a Pearl Necklace” is not different than any of the other Vermeer’s I have shot (you can see my Vermeer Gallery here). A strobe with a soft box behind the window. It may be more clear now that you can see the set and the original photo in this Lightroom screen capture. Note that this is the RAW file straight out of the camera with zero processing. The nice light on the rim of her face is achieved by accurate metering of the light.
 Depending on the scene I may use a reflector on the side to fill in some light coming through the window.
 Props
 You will need Chinese porcelain dishes or imitations. The Dutch were fascinated with Chinese porcelain and they were a definitive status symbol. The porcelain dishes used by most masters, including Vermeer where from the Wan-Li period a.k.a. as Kraak porcelain, the drawings were crude but the dishes were very thin. I ended up drawing my own using thin white plates and permanent blue markers. There are plenty of Wan-Li dishes photos if you Google them, I copied some designs from them.
Persian or oriental rugs (to be placed ON the table). These were outrageously expensive in XVII Century Netherlands; the Dutch placed them on tables to avoid stepping on them. I found some worthy rugs for these Dutch photo-paintings at Toronto’s St. Lawrence Market, but I was unwilling to bargain down from the $300 the seller was asking. I have used upholstery instead, which has a thick fabric and visible texture.
 I have collected an incredible amount of props for these works: A skull, hexagonal hourglass, a writing tools box, quill and ink tank, candle holders, candle snuffer, salt cellar, etc.
 Some of these props are impossible to purchase so I had to build or create myself e.g. foot warmer (see "The Milkmaid has Left" detail above), a map (you can see it here), fancy writing utensils box (see it here), a balance (see why at right), etc.
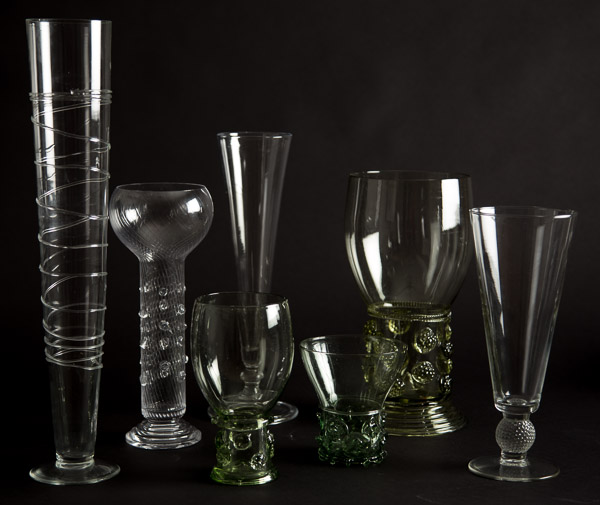
Replicas of glassware from the period; that is a roemer, berkemeyer, passglass or pala galss, flute glass or the more rare Venetian glasses (I haven’t been able to find one).
The First Shot
After all this hard work, I was excited and also a bit apprehensive as well. Is it going to work? Would I get the lighting I wanted? I was very pleased with the outcome. Here is the first ever shot, straight out of the camera with zero processing other than converting from RAW to JPG for publication here. If you know Vermeer’s work, you can easily see what I was shooting for “The Milkmaid” a.k.a. “The Kitchen Maid”. You can see the finished version here
 To be continued…..
Next post I will cover post-processing.Feel free to connect with me in Facebook or Twitter
No comments:
Post a Comment